Do you guys have a lot of fancy-looking inverted ‘P’s in your Word document and don’t even know what to do about them? Well, you guys are in the right place to learn how you can get rid of them. The inverted P symbol is actually called a Pilcrow (¶) and is basically used to mark a new paragraph or a new section of a text. It is also called the paragraph sign, Alinea, the blind P, however, most popularly the paragraph mark. In this article, we are going to talk about How to Remove Paragraph Symbol (¶) in Word. Let’s begin!
Pilcrow is actually a non-printing character or formatting marker, which means it is hidden and isn’t mostly displayed in Word or in a printed copy. In the simplest of terms, the number of paragraph marks in a document is actually equal to the number of times you guys have hit the enter key whenever typing.
These symbols may also look tacky and make the document look more confusing as well as complicated to an average reader. It may also feel obsolete in the modern tech-driven minimalistic world. However, you guys have to check if there is a paragraph on an empty page as well as go through tonnes of paragraphs at once. Then this tool is actually your best friend. The symbol comes in handy when you need to fix a document with messy as well as wonky formatting.
A great tip whenever proofreading a document is to read it once without even the nonprinting characters. Completely focusing on the content and also the second time with these characters visible to fix any formatting issues as well.
Contents
How to Remove Paragraph Symbol (¶) in Word
Removing these pesky Pilcrows is pretty easy. There are three simple as well as straightforward methods, all of which are below in a step-by-step manner below. The methods range from finding and replacing individual Pilcrows to tapping on a single button as well as removing all of them at one go. Each and every method has its own pros and cons, go through them. And then decide which one’s best for you as per your requirements and needs. So let’s now see how to remove Paragraph Symbol (¶) in Word via the below methods:
Remove Paragraph Symbol using Word Options
Word Options can also help view and update settings. It lets the user modify their interface and hence personalize it based on their needs and also changes startup settings for MS Word as well. There are many advanced methods that we can use to control and customize editing tasks, printing preferences, document display, as well.
This method is especially helpful whenever you guys don’t need paragraph makers. However, want the rest of the formatting tools in order to remain visible.
(For Example, you guys don’t have to view the paragraph marks, however, want to see the hidden text.)
- Tap on the ‘File’ menu located in the top-left corner.
- Then just find ‘Options’ in the following menu and tap on the same.
- A new window titled ‘Word Options’ will now pop up on your screen as well. In the Word Options window, you need to find the ‘Display’ setting on the left side.
- In Display, just locate the box next to ‘Paragraph marks’ and then untick it. You guys can find this option located under the ‘Always show these formatting marks on the screen section as well.
- When unselected, then click on ‘OK’ at the bottom of the window in order to save the changes.
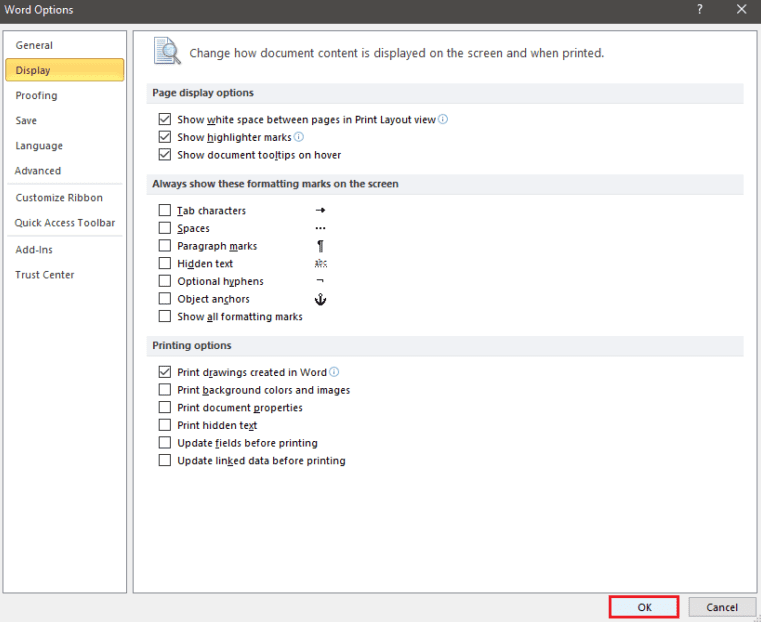
It will then take you back to your document and the paragraph marks will hide whenever the rest of the text remains unaffected.
The button with the Pilcrow icon basically controls most of the formatting symbols used in MS Word. These actually range from paragraph marks. In order to section breaks as well as optional hyphens, hidden text and many more. This method is actually the simplest one for getting rid of these pesky Pilcrows.
First of all, just search through the ‘Home’ tab and then locate the ‘¶’ symbol. You will be able to find it in the ‘Paragraph’ section. Tap on the button and all the paragraph marks when visible will be hidden along with the rest of the formatting markers.
You guys can also enable as well as disable this option using the shortcut key ‘Ctrl + Shift + 8’. This method might be super simple and straightforward. However, it is not specific to paragraph marks, one should remember that all formatting markers will actually disappear once disabled. These basically include:
Further
- Line Breaks: These are represented via a right-angle arrow pointing towards the left (↲ ), it is basically inserted when you tap on ‘Shift + Enter’.
- Tabbed Character: These display special characters that can also be inserted into a document along with an Arrow (→).
- Spaces: Any space between two words is actually represented along with a tiny dot (·) between them.
- Hidden Text: MS Word actually has the feature in order to hide or suppress text in the display or while printing. Here, all the hidden text will display along with a line with dots under it.
- Optional Hyphens: Optional Hyphen symbol (¬) basically indicates were to divide a word at the end of a line. These are not printed unless a word actually breaks at the end. If/When they actually do, they print as regular hyphens as well.
- Object Anchors: This basically shows which paragraph in the document has a floating object associated with. It is symbolized along with a tiny anchor symbol (
 ).
). - Page Breaks: These appear whenever you guys have pressed ‘Ctrl + Enter’ in order to break the page.
Find and replace the Paragraph Marks
In this method, you guys simply find all the paragraph marks and replace them. Along with a blank space hence, deleting them in the process. This method is especially helpful when you guys want to remove these paragraph symbols from a specific section of the text, and not the entire Word document.
- First of all, choose the text you want the paragraph symbol to remove from (or by default it will then remove from the entire document).
Now, in the ‘Home’ tab, tap on the ‘Replace’ option that is under the ‘Editing’ group. Tapping on ctrl + H’ keys will also do the trick.
- When the ‘Find and Replace’ dialogue box pops up, just make sure the cursor is in the ‘Find what’ box. Then tap on ‘More>>’ that is located at the bottom left corner.
- Now, tap on ‘Special’. This basically opens up a list of special characters available in order to use in a document.
- Just choose ‘Paragraph Mark’ from the list.
- When you select, ‘^p’ will then appear in the ‘Find what’ box.
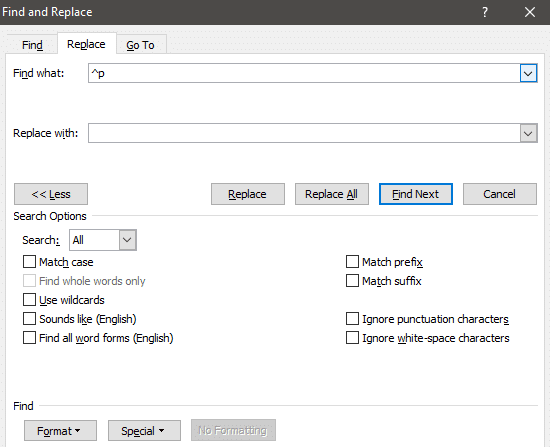
(Well, if ‘^p’ accidentally appears in the ‘Replace with’ section, there is actually no need to worry about repeating the process. You guys can simply cut and paste it into the ‘Find what’ box.)
- You have to make sure that the box next to ‘Replace with’ is blank. Tap on ‘Replace All’ in order to replace the symbol from the selected text or the entire document. If you want only particular paragraph marks to be gone then individually replace Paragraph marks via clicking ‘Replace’ at almost every instance.
When replaced, you can quit the dialogue box and then head back to editing the rest of your document.
How to add the Pilecrow only in specific places?
Many times, you guys might only need to add paragraph marks or the ‘Pilecrow’ symbol in particular places and leave the rest of the document untouched as well. This won’t really reveal your document’s formatting as well as display any other formatting marker. Keep in mind that a symbol you add, you guys can think of this as adding a simple exclamation mark or question mark in a sentence. This won’t really have an effect on the word count but will actually increase the character count.
The process for adding these markers is really easy and as below:
- First of all, position your cursor in the place you guys want the paragraph mark symbol to add in and then switch to the ‘Insert’ tab in the menu bar.
- It is located on the right, you guys will find the ‘Symbol’ option. Tap on the arrow next to it to launch a drop-down menu.
- In the drop-down menu, just tap on ‘More Symbols…’
- Now, a ‘Symbol’ dialogue box will then pop up on the screen. Tap on the ‘Special Character’ tab located next to the ‘Symbols’ tab as well.
- Now head to the list to find the Pilecrow symbol or ‘¶’ located next to ‘Paragraph’ and tap on it.
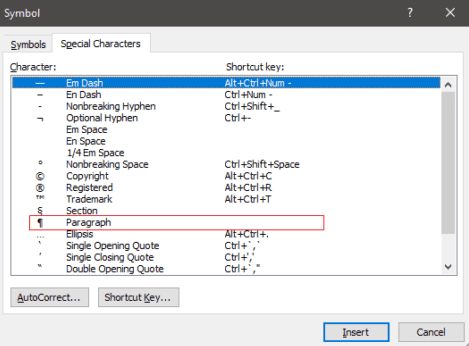
- When you highlight the selection, then tap on the ‘Insert’ button that is at the bottom.
Further
Whenever you tap on the Insert button once, the pilcrow symbol will then add to the place where the cursor actually was. You can also keep changing the cursor’s position and simultaneously tapping on ‘Insert’. In order to add paragraph marks in many places throughout the document.
A quick tip: Whenever the Word is in full screen, you guys can adjust the position and size of the Symbol dialogue box. (Through dragging on the corners as well as borders of the window). In such a way that the document is also visible in the background. Now, you guys can easily and quickly keep changing the position of the cursor. Along with your mouse insert the symbol in many places.
Just like that, when we insert one paragraph marker, then you can quit the pop-up box and copy only the Pilcrow symbol from one place as well as paste it in another. Shortcut keys being ‘Ctrl + C’ in order to copy and ‘Ctrl + V’ in order to paste it in many places.
Conclusion
Alright, That was all Folks! I hope you guys like this article and also find it helpful to you. Give us your feedback on it. Also if you guys have further queries and issues related to this article. Then let us know in the comments section below. We will get back to you shortly.
Have a Great Day!