Well, admittedly, iTunes is never the best choice to transfer data from PC to iPhone or iPad. Well, that’s mainly because it will cause the loss of the existing media files on the iOS device through syncing and using iTunes lacks flexibility. Luckily, there are a lot of other proven ways for you to transfer photos. Or many other types of content from PC to your iPhone (or iPad). In this article, we are going to talk about How to Transfer Photos from PC to iPhone Without iTunes. Let’s begin!
Documents is a really famous iOS app that uses Wi-Fi to transfer data from computer to iPhone and vice versa. You can also transfer files, images, videos, and pretty much everything to your iPhone with this app. It even lets you transfer all of the movies to the iPhone and also watch it on your next road trip right from the Documents app. Let’s see how it actually work.
Contents
Before we begin
You guys are going to need
- A Windows Computer
- An iPhone
- A WiFi Hotspot or Access Point
- An Active Internet Connection
How to Transfer Photos from PC to iPhone Without iTunes
- First, of all install the Documents app on your iPhone or iPad.
- After you download finishes, then run it. Press the ‘Services’ button on the bottom and choose ‘Wifi File Transfer’.

- Now, just open docstransfer.com on the web browser on your PC and scan the QR code along with the Documents App.
- The app also establishes a connection and starts the server within seconds. For security reasons, you guys would have to keep the app and the tab on the web browser. Open during the file transfer or the connection might break actually.
- You will also need active internet access in order to establish a connection for the first time. When you do that, all files will be transferred over Wi-Fi.
- Documents app has access to the Photos app and the iCloud which means you guys can access all the files from just one single app. In order to keep things organized, you can also create separate folders within the app.
- Transferring the files is pretty easy, just drag and drop the files to the webpage in order to transfer the files to the iPhone. The app transfers the files really quickly.
Further
- After the files are transferred, the pictures remain within the Documents app. You guys can manually transfer the files to the Camera Roll. To do this, just head to the folder where all the transferred images are kept. Choose all the images and press the ‘Move’ button on the bottom. Now, you guys can choose the directory ‘Photos’ and tap the button on the bottom in order to move the files to the Camera Roll.
- All of the selected files have been moved to the Camera Roll and deleted from the Documents app. Easy Right? Well, you guys can do much more than that. Documents can also play videos right from the app so that you can easily copy all of the movies to the App and watch those on your next road trip.
Pros
- High Data Transfer Speeds
- Also supports Multiple File Transfer
- Uses only Wifi to Transfer the Files
- No need for additional app installation on Desktop actually
- Easily Relocate Files to Camera Roll
- No Compression on media Files
- Plays Videos Natively
Cons
- Need an active Internet Connection to initiate a Connection
Transfer Photos from PC to iPhone without iTunes
The document is a simple app that you can use in order to transfer Photos from PC to iPhone. It creates its own HTTP server where you guys can interact with all the other documents, upload files, videos, and also images in a jiffy. It has a lot of nifty features such as you can transfer movies from your PC and watch it on your iPhone which makes it an excellent choice.
Alternatively,
- You can also use SHAREit, Send Anywhere, however, they need a bit of setting up.
- Google Photos and WhatsApp Web are good options if you are okay along with compression.
- Finally, DearMob is a perfect iTunes alternative, if you guys can pay $59.95 for 1 year
How to transfer photos from computer to iPhone via CopyTrans Photo
If you are looking for an instant way in order to transfer your images to your iPhone. Then we have a solution just for you: CopyTrans Photo. The app has an intuitive interface and it gets things done instantly and you can see thumbnails of all the files you’re operating at any moment. The process of transfer is intuitive, however, you can always see our instructions below!
- If you have not done so already, download and then install CopyTrans Photo:
- Open CopyTrans Photo. Connect your iPhone to the PC along with a USB cable. If prompted to trust PC, then tap “Trust”.
- You guys will see your iPhone library on the left and your PC library on the right:
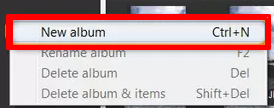
- Just create a new album in your iPhone’s Photo Library. Tap on the album: the working area on the left will display the contents (no files there for now).
- Using the folder tree on the right, you have to navigate to the PC folder along with the photos that you want to transfer.
- Now drag and drop the files from the right working area to the left
- Tap on “Apply Changes” and then wait for the syncing process to complete.
- All done now! Your pictures are now waiting for you in the folder “From my Mac” on your iPhone.
Pros
- The app will now save photos from your PC in the native Photos app on your iPhone. It will also successfully transfer the EXIF data (date created, location, etc) and preserve the order of images as well.
- You guys can also transfer videos from PC to iPhone if they are not larger than 1Gb. They will also appear in the native Photos app after your transfer.
- CopyTrans Photo is not a cloud solution and you guys don’t need to have iCloud Photos enabled in order to use it. CopyTrans Photo doesn’t need an internet connection.
- Another key advantage for users of iPhone 7 and above: the program supports HEIC photos. It can see and transfer HEIC photos, and also even convert HEIC to JPG.
Cons
- CopyTrans Photo will transfer the first 100 photos for free of cost. And then ask you to purchase a license with us (or get more free actions through spreading the word about the product). However, you can always try first and consult our 24/7 support service if you guys have any questions.
- The app does not do automatic syncing and places the photos into Photo Library actually. But, CopyTrans Photo will give a much greater opportunity to create and edit Photo Library albums than iTunes. And when you’ve organized all the photos there you can just copy them to Camera Roll on your device as well.
Conclusion
Alright, That was all Folks! I hope you guys like this article and also find it helpful to you. Give us your feedback on it. Also if you guys have further queries and issues related to this article. Then let us know in the comments section below. We will get back to you shortly.
Have a Great Day!
Also See: How To Use Robocopy To Transfer Files Over The Internet